How to Format a Blog Post: 9 Steps (Cheat Sheet)
Just having something to say isn’t enough. A great blog post must be properly formatted. It’s easier to read, gets shared more often, and ranks better in search.
In this post, you’ll learn how to format your post properly.

Correctly formatting content is an important way to optimize for search.
Blog Formatting Cheat Sheet
Detailed explanation with examples below.
- Title Lengths: Don’t use too many words (4-8) and keep them under 70 characters. We use the free LetterCount to check.
- Use Images: Every post should have at least one image. When we don’t have the right one, we buy a stock photo – usually for less than $1.00
- Poor / No Image Names: Every image should be given a unique name that reflects its content and your target keywords.
- Adjust the URL: Delete all the words that don’t relate to your keywords. Shorter URLs are easier to promote. Google favors keyword dense URLs.
- Use Headers: Headers help break up your content into readable pieces and tell Google the theme of your post.
- Outbound Links: Don’t forget to add links that connect related posts. A good rule of thumb is one link per 250 words.
- Inbound Links: Once your post publishes, link to it from a few of your older posts or pages. Don’t forget to share the links on social media.
- Make Lists: Readability is instantly improved with the good use of bulleted and numbered lists.
- Write Short Paragraphs: Help your readers enjoy your content by breaking it into bite-sized pieces of 1-4 sentences each.
Here are the detailed 9 steps to format your blog post:
1. Title Lengths
How long should your post title be? There are always exceptions but if it’s too short, it won’t properly reflect the content. And if it’s too long, readers can’t really tell what it’s about at a glance.
There are two factors:
- Character length: this includes letters, spaces, and punctuation and is important for search engines.
- Word length: this is important because titles should be easily scanned and understood. Too many words can make it confusing.
The maximum length for a post title is 70 characters. That’s because Google, Bing and Yahoo all have a visible width of up to 70 / 71 / 71 characters each. While you can choose a longer title, it won’t display in search engines.

Post titles should be scannable – which means they can be understood at a glance. Many bloggers suggest a title length of 5-8 words. This is important. A wordy title is often confusing. We’ve had success with titles from 4-12 words.
Title Length Tip: I use a free app called LetterCount.com. Just copy/paste your proposed title into the box and click “count characters”. It’s a fast way to check and adjust your post titles.
2. Use Images
Not all posts lend themselves to images. But you should still use them.
If we don’t have something in our own library, we buy a stock image. Images cost less than $1.00 (when bought with credits).
Why Use Images?
- Images appeal to emotions
- They tell a story
- And they break up the long copy, making the post easier to read
3. Poor/No Image Names
There are two great reasons to name each photo that you publish:
- SEO: Google can’t tell what your photo is about. You have to name it so Google can index it.
- Readers: If your photo doesn’t display in your post, your readers will see the title and know what it was supposed to be.
How to Name Your Images
I try to keep image names from 2-4 words. The goal is to properly describe what the photo is. Keep out any unnecessary words. Think about what you would search for to find this very image.
Use different names. Don’t name them all the same thing. If you are writing a post about eagles in Cuenca you would obviously include a set of photos. But they wouldn’t all be of the same thing.
You might have some closeup, feeding, flying, and resting shots. Make sure that your image names reflect what the image is actually about.
4. Adjust the URL
URL is the web address of your specific post. It is an abbreviation of the term: uniform resource locator. Every page, post, and image on your site has a unique URL.
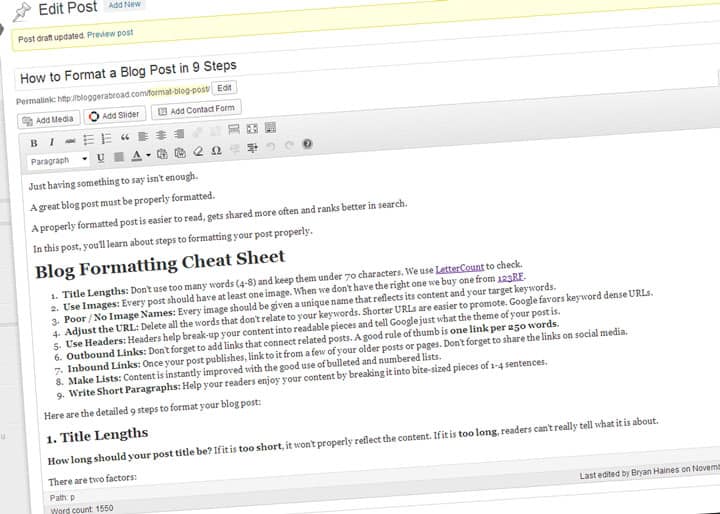
When you give your post a name, the permalink is automatically generated. While it will remove punctuation and capitals, it uses every single word. In most cases, this is not what you want. Adjusting the URL inside of WordPress is very easy.
How to Shorten Your Post URL
Once your title is determined, you can just click on the “Edit” button to the right of your permalink.
This is located under your title box at the top of the Edit Post page. You will want to keep all of the keywords but delete any duplicate or unnecessary words.
Remember: When it comes to URLs, less is more.
What is the benefit of a shorter URL?
- Without editing, the URL would automatically render like this: https://storytellermedia.io/15-free-sources-of-targeted-website-traffic-how-to-use-them/
- By deleting unimportant words, the URL is significantly reduced: https://storytellermedia.io/targeted-website-traffic/
3 Benefits to Shortening the URL
- Readers can understand quickly what the post is about
- Google understands the point of the post. Keyword density is an important factor in SEO
- Shorter URLs are easier to share on social media
5. Using Headers
Headers improve the reader experience. They break up your content and organize it into themed sections.
Google also loves headers. They rank your site content, in part, by your use of headers.
What Header Should I Use in My Post?
WordPress offers six types of header presets. While their appearance can vary based on your theme, Google ranks them the same regardless of their color or font size.
- H1: Your blog title. It is uncommon to use an H1 header in the body of the post.
- H2: This is the primary header inside of your post. It breaks your content into major sections.
- H3: This is great for subsections under the main H2 headers. For example, the header “Using Headers” is an H2, and the sub-header of “What Header Should I Use in My Post?” is H3 because it relates to the H2 header and is nested under it.
- H4-H6: I’m sure that some bloggers use these headers but I haven’t seen an application for them yet.
In addition to the headers, there are a paragraph, address, and preformatted settings. Paragraph is standard for general text.
This is the option you’ll use to get the text back to “normal” if you accidentally select another header. The other two are not often used. I have used the preformatted preset for the legal fine print.
Google also weights the bold setting on both headers and paragraph text. I almost always bold my H2 headers because it makes them visually stronger.
6. Outbound Links
A good post must link out to other posts. Without outbound links, you are sending your readers down a dead-end street.
Good posts often link to other resources including other blogs and service providers.
How to Create Outbound Links
Just copy the URL of your target post and paste it into your new post using the Insert Link tool (or Alt + Shift + A) at the top of the WordPress menu. Be sure to select the keyword(s) that you want to hyperlink.
The other option to consider is the checkbox “Open link in a new window/tab”. This is most often used when linking to another domain – so when a reader closes the new tab your site will still be open in their browser.
The only caution is not to overdo it. While some links to related content are helpful, too many become distracting and unsightly.
7. Inbound Links
There are two kinds of inbound links:
- Links you place: These are the easy ones. It’s a good idea to go back to older posts and link to your new ones. You can also add links to specific pages. Social media is an obvious place to share links that generate inbound traffic.
- Links your readers/fans place: This takes some time and some great content. But once it starts happening, your site traffic will take off. Readers might write about (and link to) your post or your main site. Or they might share it with their online communities. Late yesterday afternoon, a reader shared this post 73 Blog Ideas: How to Write Your Next Post on Inbound.org and my daily traffic tripled. Write great content and readers will share it.
This can’t be forced. Inbound links can be encouraged by great content, but this takes time. There are obvious, immediate benefits to inbound links.
Google also ranks inbound links and this will improve your search engine ranking over time.
Need help finding links? Using an SEO plugin can help suggest a relevant link. For suggestions, here’s my guide to the best SEO tools.
8. Make Lists
Lists are a great way to break up long paragraphs and make the content more scannable. Lists can be made out of any set of content.
For example, lists could be made of:
- reasons
- supplies
- websites
- steps to accomplish something
- tourist attractions
There are at least 10 lists (both bulleted and numbered) in this post. The post itself is a list, and many of the individual points have lists as well.
WordPress has a built-in list tool. (both <ol> and <ul>). Use these to improve your content.
9. Write Short Paragraphs
Similar to the previous point, short paragraphs mean an easier read. This has nothing to do with SEO and everything to do with the user experience.
There is nothing worse than a poorly formatted blog with amazing content. Not only is it hard to read, but it makes the reader question how good the content/blogger really is.
Take the time to properly format your posts and you’ll see huge payoffs.
What Would You Add?
What formatting do you always apply to your posts? Have you used any of these suggestions?
Please share a link to a post that you feel has been well-formatted, even one of your own.