HTML Cheat Sheet: 19 Essential Tags for Non-Techie Bloggers
HTML coding is for developers, not bloggers, right? That’s true to a certain degree. The WordPress blogging platform makes it almost unnecessary to know HTML.
Compared to years ago, I seldom use HTML. Back in the day, I used to hand-code my sites. Of course, it took forever, and they didn’t look very good. 🙂
But there are times when you’ll need to know some HTML. (Given that you’re reading this post, I’m guessing you need it now.)
To help you, I’ve created this HTML cheat sheet with all the essential tags.
Let’s get started!
What You’ll Learn
Here’s what you’ll learn in this post:
- How HTML Works
- When You Need HTML
19 Ways to Use HTML: HTML Cheat Sheet
- 13 Text Formatting HTML Tags
- 3 Image Formatting HTML Tags
- 3 Hyperlink HTML Tags
How HTML Works
As you’ve probably noticed, HTML requires an opening and closing tag. Each tag modifies what follows it. When you want to stop modifying the content, tell it to stop. So, you insert a closing tag.
For example:
To create this bolded header: How HTML Works

As you can see, there is an opening bold tag. You need to add a closing bold tag to stop it from bolding the rest of the post. It is that simple.
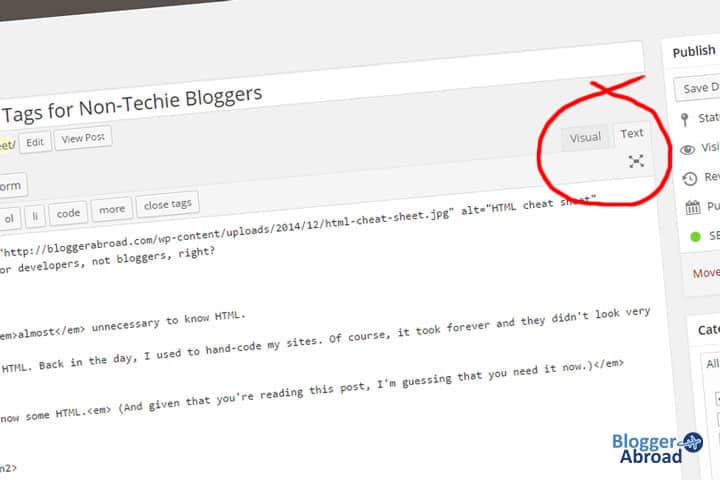
As you write a new post, you can switch between Visual and Text mode (see image below).
Important: You must be in Text Editor mode to edit HTML code.
When You’ll Need HTML
While the Visual Editor will work for most settings, there are times when you’ll need to get into the HTML code.
Here are a few examples:
- Copy and Paste From Another Page/Site: Maybe you copied a line of text from somewhere else on your site and now everything is gone weird on your post. Don’t worry! Switch to the Text Editor mode and take a look. The most common issue is the errant addition of div tags. These can mess up any page. To fix the formatting errors, just delete all instances of the div code.
- Add Images to Sidebar: To create custom buttons or ads in your sidebar, you’ll need to know a little basic HTML. It isn’t hard – and there is a section below for that.
- Fix Wonky Formatting: Sometimes things just go sideways. Maybe your header has become part of your ordered list. Or a paragraph is center aligning with the photo below it. With the basic HTML explained below, you’ll fix this in no time.
- Improve Your Blog Formatting: Sometimes the presets just don’t cut it. With some basic HTML, you’ll be able to tweak your post and improve its design and readability.
HTML Cheat Sheet: 19 Ways to Use HTML in Your Blog
In this post, I’ll give the opening/closing tags to accomplish each of the features. Make sure you are in Text Editor mode when you use these!
Here’s your HTML cheat sheet: the 19 HTML tags for non-techie bloggers:
13 Text Formatting HTML Tags
Because WordPress wants to translate every HTML code literally, I can’t include them exactly.
To make this code work, be sure to replace the round bracket with the angle bracket. Of course, use left and right, as indicated.

- Paragraph: Paragraph text. (p) You won’t need to add these. WordPress is smart enough to break your paragraphs automatically. But you might want to force a break – especially in your sidebar if you add a combination of text and images.
- Heading: Heading 1. (h2) These are available in six different levels: H1 – H6. The appearance of these preset headers depends on your theme settings. A general rule of thumb is to never use H1. This is reserved for your blog title – and used automatically by your theme. Use H2 to show primary content themes and H3 for sub-sections. I never use H4-H6. Heading tags are important for both organizing your content for readers and search engines. It clearly defines what your text copy is about.
- Block Quote: (blockquote) <blockquote>These are great for highlighting content or quotations.</blockquote> If your theme allows, these will often intent, add a colored background and make them italic. It all depends on what the theme presets are.
- Bold: (b) <b>Make it Stand Out!</b> This is good to use for headers (I often bold my H2 headings) and key expressions in the post. If not overused, bolded text makes the post more scan-able. You can also use the code <strong></strong>. This tag will give the same result as bold.
- Italic: (i) <i>Add emphasis with italics</i> These are good for questions and for highlighting individual words and phrases. You can also use the code <em></em>. This tag will give the same result as italics. The <em> is short for “emphasized”.
Strikethrough:(s) <s>This is a good way to update your post, without deleting the incorrect information.</s>- Underline: (u) <u>Similar to bolding, but not as common</u> Underlining helps draw the eye to key points. Might work well for a header or a call to action. I generally don’t use underlining.
- Ordered List (numbered): (ol) with (li) This will create a numbered list of points (just like this list). Each item on the list will open/close with the tags.
- Unordered List (bulleted): (ul) with (li) This will create a bulleted list of points. Each item on the list will open/close with the tags.
- Paragraph Alignment: Paragraphs and headers can be left, right, and center-aligned. (p style=”text-align: center;”)
- Header Alignment: Headers are more often centered. Here’s how to do it: (h3 style=”text-align: center;”)
- Page Break: Using the single tag (br /) you can create a forced, measured space. This might be useful for creating a space between text and graphics. Note: this only needs one tag – and there is a space between the “br” and the “/”.
- Horizontal Line: Place a horizontal line anywhere in your post. This is good for dividing content. Enter the single tag (hr /) Note: this only needs one tag – and there is a space between the “hr” and the “/”.
Want to use more than one tag at a time? No problem! Here’s how it will look:

2 Image Formatting HTML Tags
- Insert Image: This is another example of a single tag. Because it is only inserting an image, this is all that’s needed. There is no closing tag. See first image below.
- Image Align: Inside of the image tag above, you’ll insert the following second image below. In place of the word right, you can also insert “left” or “center”.


3 Hyperlink HTML Tags
- Link Text: This code will turn the anchor text into a clickable link. Your anchor text can be any word (or set of words).
- Link Image: To turn a link into a clickable button or ad, just combine two elements. Instead of using anchor text like in the above example, use the image code. For example: See second image below. This turns the image into a clickable button that directs to the url you entered. Don’t forget your closing tag of </a> or else everything below that on the page will also become a hyperlink.
- Control Where Link Opens: Generally speaking, you’ll want your links to open in the same tab as it was clicked. This is the default, so you don’t need to add any extra code for this to happen. If you are linking to another site (including an affiliate offer) you should add target=”_blank” to the link code. This keeps your original tab open for your reader to return to, after they finish reading the new page. This also works on the linked image code.


So there you have it! The complete HTML cheat sheet for bloggers.
Knowing how to use HTML is important. Now, learn about how to format your post properly. Of course, no amount of formatting can cause readers to overlook heinous word crimes.
Here’s how to edit blog posts that you didn’t write.
Your Turn
What HTML causes you problems? Is there one I’m missing?
Please share it in the comments below.